👻🎃🕸👻🎃🕸👻🎃🕸👻🎃🕸👻🎃🕸👻🎃🕸👻🎃🕸👻🎃🕸👻🎃🕸👻🎃🕸👻🎃🕸👻🎃🕸
For the last five Sundays, I posted photos of the pumpkins I have been carving for Halloween nights. People were admiring my Jack-o-Lanterns and asked, how I carve them. In this blog, I will explain it.
Before I even think about this carving process, I have to look for the right pumpkin in the store or pumpkin patch. The key points, I’m looking for are:
- Does the pumpkin have any nicks or bruises?
- Does the stem look healthy and is not cut too short?
- Is the pumpkin big enough for what I would like to do with it?
- Does the pumpkin have a smooth surface?
- Do I really like the pumpkin or should I keep looking for a better one?
A pumpkin should look healthy. Because it will rot if it has nicks, bruises, or the stem is cut too short. It also should be the right size for the pattern, I have in mind. The pumpkin should be smooth and without warts. Having a bumpy surface makes it harder to apply the stencil and carve the pumpkin. Sometimes, I look at a pumpkin and think: This is not the right one, I just keep looking. Since I started looking for pumpkins at the beginning of October, there is plenty of time to find the perfect one for my project.
Usually on October 30th, I begin to carve pumpkins. This gives me an extra day, in case I’m getting too busy on Halloween. I’ll let you know, how I keep the pumpkins nice and fresh for a day or two before they have their big day on our front porch.
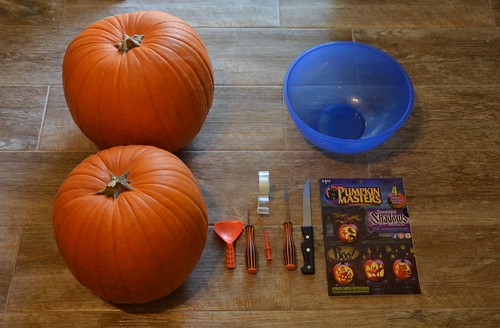
- First I gather all my tools, bowls, stencils, and of course, pumpkins together, before I begin with the carving. A couple of days ago, the girls and I decided on what pattern they like to get carved into their pumpkins.
- After I opened the pumpkin with a kitchen knife, I got those gooey pumpkin guts out. (Usually, I cut it at an angle. The warmth of the candles shrinks it a little bit. That way it stays on the pumpkin and won’t fall inside of it.) When Katelynn was little, she always helped me and said: “We have to get the pumpkin-yikes out of it, before we can carve the pumpkin!” So cute! She still calls it “pumpkin-yikes”.
- I always use the scraper to clean the pumpkin from the rest of the stuff, which keeps the seeds in place. With this tool, I can thin out the walls a little bit more. If the walls are too thick, the pumpkin is harder to carve. But if they are too thin, they can break easier, while I’m carving. Over the last few years, I’ve got a better feeling about it, how thick the walls are supposed to be. 😉
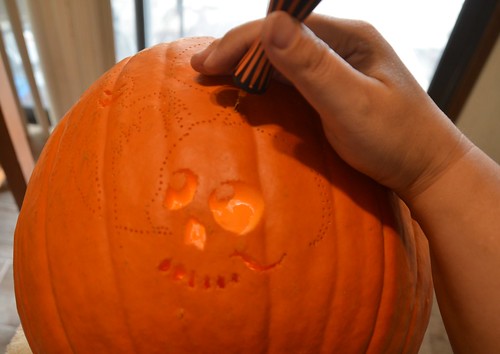
- The pumpkin is clean inside and wiped down on the outside. Now I can apply the stencil with some Scotch tape before I use the poker around the lines. Personally, I do not recommend getting the stencil wet for a better fitting on the pumpkin surface. It takes forever until the paper is try. I never have the patience to wait for that. And poking the holes into wet paper makes a mess because it will rip faster.
- As soon as the pattern is poked into the pumpkin, I remove the stencil. I always keep the stencil sitting next to the pumpkin as a reference. Sometimes a hole is not poked perfectly or the holes are too close together. Some people use a crayon or another marker to connect the lines.
Once the stencil is removed, the carving can begin. A few years ago, I spent a little extra cash to get better carving tools. The tools, they provide with the stencil booklets are good for some carving. But I’ve noticed, I had to re-buy them, because they bent and/or become dull. I love this saw, as you can see in the picture. It has a bigger handle as well. - My little secret to keep the pumpkins in shape for a couple of days: I soak them with a splash of bleach in ice water. Some people wipe them with vinegar and use some vaseline, to prevent them from molding and drying out. But I’m not a fan of the vinegar smell; and the vaseline just looks messy, if it is not applied correctly.


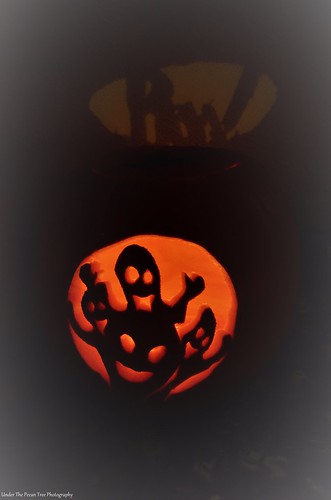
When the “Jack-o-Lanterns” were still damp from soaking them in water, I lit them with a few tea candles to see, how they look in the dark. Katelynn and Sara can’t wait for Halloween night to get the pumpkins on the porch and show them to the kids from the neighborhood.
Are you ready for the results? Here are the “Jack-o-Lanterns” of 2017:


HAPPY HALLOWEEN!
👻🎃🕸👻🎃🕸👻🎃🕸👻🎃🕸👻🎃🕸👻🎃🕸👻🎃🕸👻🎃🕸👻🎃🕸👻🎃🕸👻🎃🕸👻🎃🕸
~ October 2017 ~
